Getting to the bottom of your water woes once and for all
After experiencing the signs of hard water in the home, it’s natural that you want to determine the next steps to fix the problems—and fast. And as a quick reminder, hard water usually presents itself in the following ways:
- Spotty, filmy dishes
- Soap that won’t lather
- Scummy, hard-to-clean tubs and showers
- Dry, squeaky skin
- Accumulated white crust around faucets, drains and showerheads
The first step to solving hard water problems is to implement a water hardness test so you can find the best water softener solution. Here are a few ways to get you started:
Check with Your City
Each year by July 1, you should receive a short consumer confidence report or drinking water quality report in the mail or online notification from your water supplier. The report tells you where your water comes from and what’s in it, and some reports include your water hardness. If yours doesn’t, you can call your local water municipality, and they should be able to tell you.

Quick In-Home Testing
Without having to go too far out of your way, one of the easiest options for a hard water test is with a clear, clean, empty bottle with a cap, pure liquid soap and water right from your tap. Fill the bottle one-third full, add a few drops of pure liquid soap and shake vigorously for a few seconds. If there is a distinct lack of fluffy bubbles and the water appears cloudy and/or milky, your water is hard. Soft water would have copious bubbles, and the resting water at the bottom of the bottle would be clear. Keep in mind that because most soaps are formulated with detergents, they lather regardless of your water type. For the best results, use a basic soap, such as Castile, which is free of dyes, perfumes and detergents.
Advanced Testing Methods
The water bottle test may work well as a basic assessment, but it isn’t the most accurate way to determine your water hardness level. For that, a more sophisticated hard water test is required. A hard water kit includes test strips and a color chart. You can purchase a test kit from a home improvement store for $5 to $10, or request a free water test strip from us.
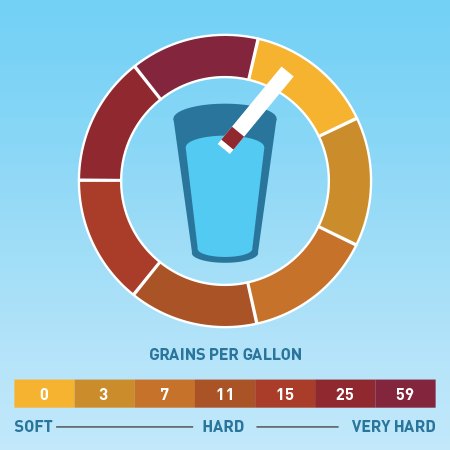
After filling a glass with cold water from your bathroom sink, insert the test strip for several seconds and then remove it. Also, it’s important to note that you should not just stick the strip under running water, as this can provide inaccurate results. As the strip changes color, compare it to the color chart included in your kit. Each color on the chart corresponds to the hardness of your water, with results measured in grains per gallon (gpg).
Major home improvement stores and many online retailers sell additional test kits that may provide a more comprehensive water assessment. These not only test for hardness, they also test for alkalinity, chlorine, iron, nitrates and/or pH. To obtain the most thorough water analysis, you can send a sample to a third-party lab, which can test for specialty contaminants such as heavy metals and bacteria. This is usually not needed because an in-home kit provides instant information and results for most water issues. Overall, knowing your water profile can help you choose the appropriate solution for any water problem(s).

What’s Your Number?
With over 85% of all households experiencing some degree of hard water, knowing your “number” will let you see where your hardness stacks up. Once you’ve tested your water with a strip or kit, the next step is to use your “number” to see just how hard your water is. The average hardness in the U.S. is about 13 grains, which is considered “very hard.” Anything over 14 grains is deemed “extremely hard.” Even if you don’t live in the high hard water zones, a household starts seeing the effects of hard water at around 7 grains of hardness. If you know your hardness number, finding the right softener for your home is easy with this step-by-step tool.


